Using Course Resources in CSC Cloud
This page contains necessary information and RULES regarding the user of CSC's computing resources that have been reserved for this course. You need to use these resources in some of the exercises, and they are also one deployment option for your project. Please read the instructions and rules very carefully.
Services Available
Here is a brief listing of the services that are available for use.
- cPouta - Infrastructure as a Service (IaaS) platform where you can set up full-fledged virtual machines. Required in exercise 3.
- Rahti - Container cloud for deploying applications in containers. Container orchestration is done with OpenShift (enterprise version of Kubernetes). Required in exercise 3
- Pukki - DataBase as a Service platform (DBaaS) where we have set up two PostgreSQL instances that you can use for exercise 3 and your projects.
Getting Access
Nominate a contact person from your group and have them email the course staff in order to receive an invite link for the project. Only one account per group will be accepted into the project. Before asking, read through the rest of these instructions at least up to generating an SSH key pair, and include your public key in the invite link request.
Rules of Use
On this course we are using shared resources that are limited, and also ultimately paid from taxpayer money. It is important that we treat these resources with respect, and also make sure everyone in the course has the ability to use them. For this purpose we have laid out some simple rules that everyone must adhere to.
Failure to follow these rules will give your group a warning for the first infraction. The second infraction will get you banned from the project. This means that you may also lose points for exercise 3 as you cannot complete it without using the cloud environment, and your group will have to set up your own platform in order to get full points for project deployment related categories.
- Do not tamper with course infrastructure
- Infrastructure used for some exercises is in the same cloud, you are not allowed to manage these in any way.
- Unlike the other rules, breaking this one will get you instantly banned without warning.
- Always use minimum amount of resources.
- When creating VMs, use the tiny image flavor.
- In Rahti set reasonable resource limits, and do not create large persistent volume claims, a few MB is sufficient.
- Always use your group name for all of your resource reservations, and always use consistent spelling for it.
- If we spot resources without clear group indication in the name, they will be deleted on sight.
- Do not leave VMs or containers running. When you are done with an exercise task, or with your project meeting presentation, make sure to release the resources for other groups.
- In cPouta, either create a snapshot or delete your VM after use.
- In Rahti, scale your replicas to 0 or delete your deployment.
- Do not create new database instances in Pukki
- We have created two instances where you can create databases, there is no reason to create new ones.
- Do not touch other groups' VMs or containers.
- If you think a group has left something running, report it to the course staff.
- Do not allocate floating IPs
- We only get two public IPs in cPouta, both are reserved for course infrastructure servers.
- Do not attempt to use other groups' VMs or containers in your exercise task submissions.
Managing VMs in cPouta
As the expectation is that you will use Linux and be able to deploy your application on a server, we are providing you with the option to use a virtual machine in the cPouta cloud. These instructions will tell you how to set one up and how to connect to it. The instructions will use command line tools, specifically OpenStack, which you can install in a Python virtual environment. It is recommended that you create a separate virtual env for this purpose. Once you have it created and activated, install the tools with
python -m pip install python-openstackclient python-troveclient
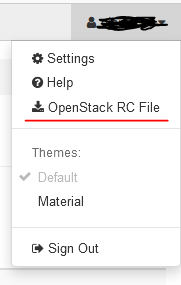
You also need to obtain an openrc file from cPouta in order to log your terminal session. Go to Pouta dashboard and download the file from the top right user menu. Note: the file is tied to a project, so if you have multiple projects, make sure you have the correct one active.
Put the file into a suitable location, like the bin folder in your virtual environment, and then source it similarly to how you activated the venv itself. In this example we renamed the file to
cpouta.sh because Pukki will also need a similar file, if you want to use it, and naming them by the service they log in to makes it easier to operate in the future.source /path/to/your/venv/bin/cpouta.sh
Due to limited number of public IPs, your VM cannot have one. This means that in order to reach your VM, you must always go through the central server we have set up. In order to get access to the central server, you need to generate an SSH key pair and upload it to the cloud, and ask course staff to add it to the central server. You also need to have the VM set up with this key so that you can connect to it from the central server. You need to generate this key pair locally on your own computer using ssh-keygen. To make the rest of the guide easier to follow, we'll start with exporting your group name into an
environment variable
. Please shorten it to reasonable length, and make it lowercase + hyphenated.export PWPGROUP=<group name> ssh-keygen -t rsa -f ~/.ssh/$PWPGROUP.key
Please include a passphrase for your key.
First you need to upload your key to the cloud. You will only connect this key to your own VM yourself, the course staff will add your key on the central server. This is done for user management so that we can create non-sudo users for each group on the central server. Upload your key with:
If you are using new openstack version:
openstack keypair create --public-key ~/.ssh/$PWPGROUP.key.pub $PWPGROUPFor older versions the command is:
openstack keypair create --from-file ~/.ssh/$PWPGROUP.key.pub $PWPGROUP
Creating a VM
Next you can create the VM itself. All instructions in the course are written for Ubuntu, so we recommend choosing the latest Ubuntu image. For flavor you should always choose
standard.tiny because it uses the least amount of resources, and is easily sufficient for our purposes. The example below uses these:openstack server create --flavor standard.tiny --image Ubuntu-24.04 --key-name $PWPGROUP $PWPGROUP-vm
You also need to attach the security group that allows you to SSH into your server. Security groups are sets of firewall rules that are used to manage which ports of the server can be connected to, and from where. We have precreated the necessary security groups for this course so you don't need to worry about creating them. The following command will add the ssh security group for your VM. It will allow SSH connections from anywhere, which is fine because your server is not accessible outside of the project's network, and also uses SSH keys for logins.
openstack server add security group $PWPGROUP-vm ssh
Connecting to Your VM
Connecting to your VM is done via two steps, first connect to the central server with your group's username. First you need to get the server's IP address, which you can do with command below. The publicly accessible IP is the latter one in the addresses field.
openstack server show pwp-central
The Ip Address can be found in the accessIPv4 access IPv6 Field. Please, notice that there are two different IPs: first one starting 192.168.x.x is internal and can be used only when you are inside the internal network. The other is the public api. That is the one you have to use.
Now you can either just use this IP (replace x.x.x.x with it) in the following commands, or alternatively you can add an entry to your ssh config file (in ~/.ssh/config in Linux)
Host pwp-central
Hostname x.x.x.x
User <group name>
IdentityFile /path/to/your/private/key
If you have this added, you can just
ssh pwp-central in the future to connect to the server. Otherwise just connect by giving all the details manually.ssh-add /path/to/your/private/key ssh $PWPGROUP@x.x.x.x
Once you are in the central server, you need to add your private key to your
.ssh folder here is well in order to be able to connect to your VM. Just open a new text file in the folder and paste the key contents there. You also need to change they key's permissions so that only your user can read it. Then either do the SSH config again, or use ssh-add and ssh to get to your server, replacing y.y.y.y with the IP address of your VM in the local network.
chmod 600 /path/to/your/private/key
ssh-add /path/to/your/private/key
ssh ubuntu@y.y.y.y
Please, not that in order to access to your VM you would need to use
ubuntu user.If you want to close the connection with your virtual machine just type the command
logoutShutting Down Your VM
Whenever you stop using your VM you need to delete it. For VMs used for the exercise, you should ideally complete the entire exercise in one session and then delete the VM. To delete your VM:
openstack server delete $PWPGROUP-vm
Connecting to Course Services in cPouta
Due to in fact being in the internet, all of the course services use transport layer security (TLS) for connections. When it comes to services in Rahti this does not have any complications because Rahti provides services with domain names and handles TLS in front of them (i.e. traffic inside the private network of a pod is not encrypted, and usually does not need to be). However with cPouta the servers have to use public IP addresses, and it is not possible to get certificates that your OS trusts by default.
To familiriaze you with this part of how the web works, we have created our own "certificate authority" (CA) and all of the course services use a certificate signed by that authority. If you try to connect to these services, any client will tell you that they do not trust the connection because it's encrypted by an unknown certificate authority. The lazy way to solve this is to simply instruct the client to ignore it. The better way is to tell it to specifically trust this CA. In order to do so, you need to download the CA certificate from below first.
When you form a connection to the server with any client, you now need to pass the path to this CA certificate file to it to add it temporarily to the group of trusted certificates. Here is an example with curl:
curl --cacert /path/to/pwp-ca.crt https://x.x.x.x/
This mechanism can also be used for authentication. When authenticating with certificates, a client needs to have its own certificate that is also signed by the same certificate authority. We will discuss this topic more in the exercises.
Connecting a Client to Your VM
As stated before, your VM does not have a public IP address. In order to deal with this, we have set up the central server to act as sort of a gateway. If you send an https request to the central server and include the header X-Target-Host with your VM's private IP address as the value, the request will be forwarded to your VM. E.g. with curl, with x.x.x.x as the central server public IP and y.y.y.y as your VM's private IP:
curl --cacert /path/to/pwp-ca.crt -H "X-Target-Host: y.y.y.y" https://x.x.x.x/api/